
Recently I was asked to update some ESXi 6.7 U1 hosts to the latest patch release. A quick look at the list of build and version numbers showed me that there is an actual express patch (EP6) which could be installed. Before performing this update in production I decided to update my test ESXi host first. If the update completes successfully and there are no issues after a few days I will continue to update the production hosts to EP6.
The following list outlines the steps necessary to perform the update using CLI (this is just a test ESXi host so there is no vSphere Update Manager (VUM) available). This procedure should be the same for other versions of ESXi 6.x even if a restart of the ESXi host may be necessary at the end.
Step 1: Make sure SSH is enabled on the host
Because I perform the update using CLI I need to login to the host via SSH. Therefore I need to check if SSH is enabled or not. There are at least three ways to check:
- Try and error: Use your favorite SSH client and simply try to connect to the management IP of your ESXi host.
- VMware Host Client: Use your webbrowser of choice and connect to the management IP of your ESXi host. Navigate to Host > Manage > Services. Check if the TSM-SSH service is in Running state, else start up the service using the corresponding button.
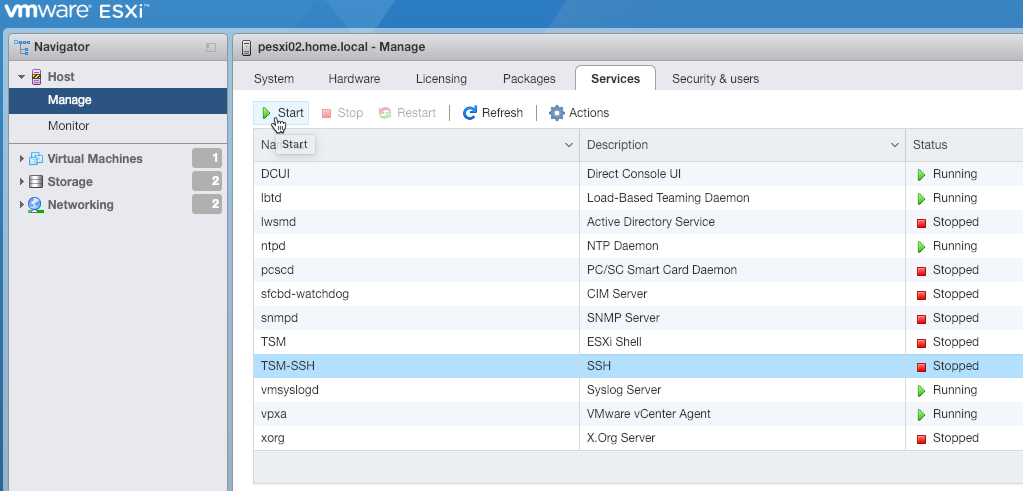
- Direct Console User Interface (DCUI): Use the IPMI of your server vendor, a KVM system or direct connected peripherie to access the DCUI. Navigate to Troubleshooting Mode Options > Enable/Disable SSH and check if SSH is enabled, else enable it.

Step 2: Enable firewall rule for web traffic
Connect to the ESXi host via SSH and enable the firewall rule to allow web traffic. This is necessary to use the VMware Online Depot in the next steps.
esxcli network firewall ruleset set -e true -r httpClient
Optional Step 3: Check the current ESXi build and version
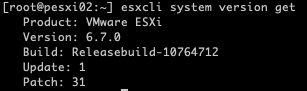
To confirm the current version of your ESXi host use the following command.
esxcli system version get
Step 4: List all available profiles in the VMware Online Depot
To get al list of all available profiles in the VMware Online Depot use the following command.
esxcli software sources profile list -d https://hostupdate.vmware.com/software/VUM/PRODUCTION/main/vmw-depot-index.xml
This list can be very extensive so it is recommended to work with filters. Appending a | grep -i ESXi-6.7.*standard lists only the profiles for Version 6.7 including VMware Tools.
esxcli software sources profile list -d https://hostupdate.vmware.com/software/VUM/PRODUCTION/main/vmw-depot-index.xml | grep -i ESXi-6.7.*standard

Step 5: Apply the selected profile from the VMware Online Depot
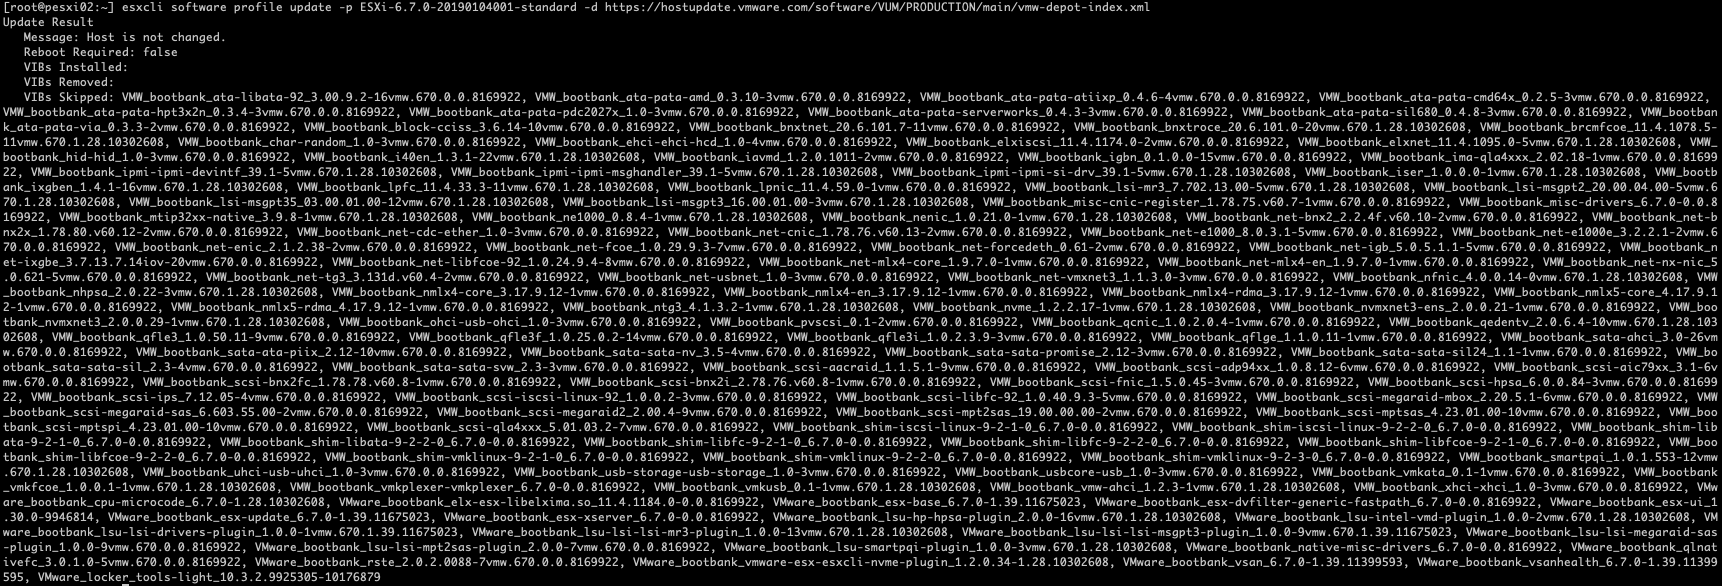
Select the desired profile and apply it to the ESXi host using the command below.
esxcli software profile update -p <profile-name> -d https://hostupdate.vmware.com/software/VUM/PRODUCTION/main/vmw-depot-index.xml
Optional Step 6: Reboot ESXi Host
If the update finishes with Reboot Required: true use the following command to reboot the host. Make sure there are no running VMs and optional the host is in maintenance mode.
reboot
Optional Step 7: Check ESXi version again to ensure the update completed successfully
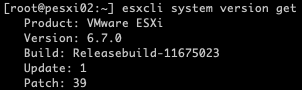
I finished the update with a final check of the running ESXi build and version using esxcli again.
esxcli system version get
Wrap-Up
With just a few commands it is possible to update an existing host to the current available EP6 using only the VMware Online Depot. Just make sure that host is configured with correct DNS settings and is able to access the internet. If this is not possible, a corresponding offline bundle can still be used for the update.
One thought on “Updating ESXi 6.x to 6.7 using CLI”
Comments are closed.