
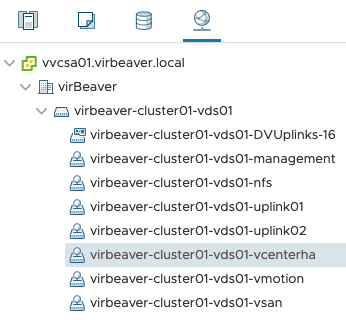
Today I demonstrated some of the new features of VMware vSAN 7.0 Update 3 (7.0 U3) related to 2-node deployments to one of our customers who uses this topology extensively. We have focused particularly on improvements to the resilience of 2-node clusters and the witness Host. You can find a short video about the features here. An extensive list of the new features and the release notes can be found here and here.
Another new feature I noticed but forgot zu demonstrate to the customer ist the new vSAN cluster shutdown and restart operation. I already tested the shutdown and restart feature with my 4-node cluster but as the demo was finished I decided to give the feature a try with the 2-node cluster and the external witness appliance.
Kategorie: Homelab
Set up vCenter HA in vSphere 6.7 U1
Today I was asked by one of my customers to configure vCenter High Availability (VCHA) in his productive vSphere 6.7 U1 environment. Now that it’s been some time since I last configured VCHA, I first tested the process in my homelab. The following procedure shows how to configure and activate this feature.
Step 1: Set up the VCHA network
Before the VCHA cluster can be set up two things have to be prepared: A dedicated network for VCHA and IP addresses for the three vCenter nodes (Active, Passive, Witness). Both requirements are displayed to the administrator directly before the configuration of VCHA in the vSphere Client.

Since my homelab is a nested environment, the corresponding network can be set up without difficulty. In a regular customer situation where the ESXi hosts are connected via physical switches, the corresponding VLAN must be created and available on the switch ports before communication can function via the new VCHA network.
Step 2: Choose the VCHA network and deployment type
After clicking on SET UP VCENTER HA you can select the VCHA network for the existing, active vCenter Server Appliance (VCSA) and the deployment type. Because my customer is running only a single site with a single SSO domain I can leave the checkbox Automatically create clones for Passive and Witness nodes checked and let vSphere do the work for me.

Now I only have to select the Location (compute), Networks and Storage resources for the other two nodes (Passive and Witness) to continue with the second configuration step.

Configuring compute, storage and network resources for the Passive and Witness nodes
Step 3: Configure IP addresses for VCHA
After configuring the basic VM settings, only IP addresses in the VCHA network for the three nodes (Active, Passive and Witness) have to be assigned. With some support from the customer this should not be a problem either. Since the VCHA network is a private network that does not need to be routed, I do not configure the default gateway.

Step 4: Wait for completion
After a click on Finish our work is done and the next steps are performed by vSphere alone. First we create a clone for the Passive Node and configure it according to our specifications. Then the same is done again for the Witness node.

At the end we have two new vCenter VMs (Passive and Witness) in the environment.

In my homelab it took about 15 minutes until the VMs were rolled out and configured.

Also, a DRS rule that distributes the vCenter nodes across different hosts in my environment was automatically created and configured.

Wrap-Up
Since the introduction of vCenter High Availability with vSphere 6.5, the process of rolling out this great feature has become easier and more intuitive. In a relatively simple environment, the high level of automation makes it a matter of minutes to get VCHA up and running. And for more complex environments, manual cloning of the VCSA still remains.
Building a nested VMware homelab
During my work with VMware products I always needed a platform to test new products, updated versions and software dependencies. In the past I used the virtual environment of my employer to deploy, install and configure the necessary systems. This always had a large downside: Me and my colleagues used the same environment to perform our tests so we had some conflicting systems now and then.
For the past couple of months, I have been experimenting with different lab setups, but nothing really satisfied my needs. So I decided to approach my homelab design the way I would approach any other client design: collecting requirements. (Even if it may not correspond to the level of detail of a real customer design.)
Conceptual Design
Here is the list of the central requirements for my homelab:
- R001: Small physical footprint.
- R002: Low energy consumption.
- R003: Low noise level.
- R004: Powerful enough to handle different use cases at the same time:
- VMware vSAN (including All-Flash, multiple disk groups and automatic component rebuilds)
- VMware NSX (including NSX DLR and NSX Edges)
- VMware Horizon (including virtual desktops)
- R005: Portable solution for customer demonstrations.
- R006: Isolated environment without dependency or negative impact to other infrastructure components.
- R007: IPMI support to power it on and off remotely.
Logical Design
To have the automatic rebuild of components (see R004) with vSAN even in case of a host failure, at least four nodes are required. Regarding R001, R002 and R003, a full sized 19-inch solution with four physical servers is not an option. Regarding the 10Gbit/s requirement for vSAN All-Flash (see R004), a solution consisting of several mini PCs is out of the question. Also, such a solution is not ideal for regular assembly and disassembly (see R005) due to the different components. To avoid dependencies on infrastructure components (see R006) despite the different use cases (see R004), a completely nested environment including AD, DNS and DHCP behind a virtual router seems to be the best option to me.
The network design of the physical ESXi host is as simple as possible and as complex as necessary. I configured two vSphere Standard Switches (vSS). The first one (vSwitch0) contains the VMkernel NIC enabled for management traffic and Standard port group for the VMs which need a connection to the Home network. vSwitch1 handles all the nested virtualization magic.
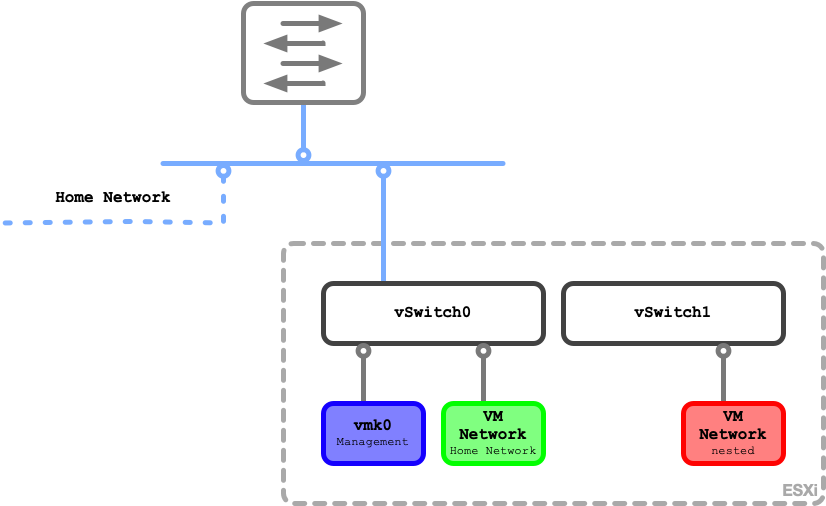
To do so I configured this vSS to accept promiscuous mode, MAC address changes and forged transmits. I also configured it for jumbo frames (MTU 9000) so I can use it for the VXLAN overlay networks using VMware NSX-V. All VMs which form the nested environment attach to vSwitch1.
Six VMs are deployed natively on the physical ESXi host. The first VM is a virtual router which acts as gateway to the outside world for the nested systems. It is configured with two network interfaces. One facing the Home network while the other connects to the nested environment. The second VM is a domain controller running AD, DNS, DHCP and ADCS. The remaining four VMs are the nested ESXi hosts which later form the vSphere cluster for all other workloads. The nested router and the nested domain controller can be reverenced as „physical“ workloads running outside of the virtualization.

Physical Design
I went for a single Supermicro SuperServer E300-8D as a starting point. This not so small beauty convinced me by the good initial values but also by the numerous Expansion possibilities. I replaced the two out of stock fans with Noctua ones and also added a third one for better overall cooling.
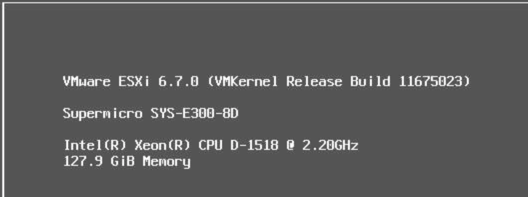
I was able to reuse most of the components from my homelab experiments and a nice system with 128GB RAM, a 64GB SATADOM device, a 1TB mSATA SSD and a 2TB NVMe SSD came together.

For all who are interested, here is the complete bill of materials of my current homelab configuration.
| Item | SKU | Quantity |
| Supermicro SuperServer E300-8D | SYS-E300-8D | 1 |
| Noctua premium fan 40x40mm | NF-A4x20 PWM | 3 |
| Kingston ValueRAM 32GB | KVR24R17D4/32MA | 4 |
| Supermicro SATADOM 64GB | SSD-DM064-SMCMVN1 | 1 |
| Samsung 850 EVO mSATA 1TB | MZ-M5E1T0BW | 1 |
| Samsung PM983 NVMe 3.84TB | MZ1LB3T8HMLA | 1 |
Wrap-Up
With this space and power saving configuration I have enough resources to run a nested 4 node vSAN cluster that uses NSX-V to run VMware Horizon on it. In one of my next posts, I’ll go deeper into the configuration of nested ESXi hosts and the associated implementation of VMware vSAN.
Updating ESXi 6.x to 6.7 using CLI
Recently I was asked to update some ESXi 6.7 U1 hosts to the latest patch release. A quick look at the list of build and version numbers showed me that there is an actual express patch (EP6) which could be installed. Before performing this update in production I decided to update my test ESXi host first. If the update completes successfully and there are no issues after a few days I will continue to update the production hosts to EP6.
The following list outlines the steps necessary to perform the update using CLI (this is just a test ESXi host so there is no vSphere Update Manager (VUM) available). This procedure should be the same for other versions of ESXi 6.x even if a restart of the ESXi host may be necessary at the end.
Step 1: Make sure SSH is enabled on the host
Because I perform the update using CLI I need to login to the host via SSH. Therefore I need to check if SSH is enabled or not. There are at least three ways to check:
- Try and error: Use your favorite SSH client and simply try to connect to the management IP of your ESXi host.
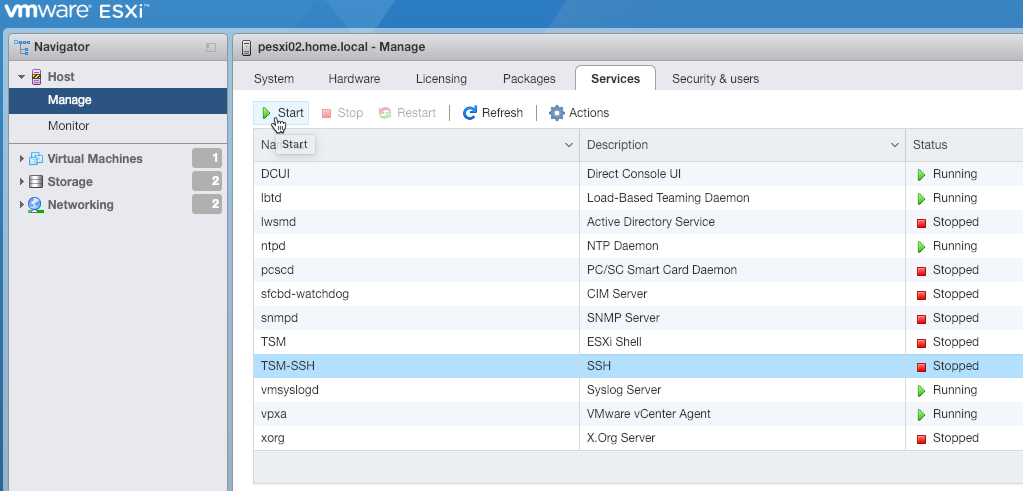
- VMware Host Client: Use your webbrowser of choice and connect to the management IP of your ESXi host. Navigate to Host > Manage > Services. Check if the TSM-SSH service is in Running state, else start up the service using the corresponding button.
- Direct Console User Interface (DCUI): Use the IPMI of your server vendor, a KVM system or direct connected peripherie to access the DCUI. Navigate to Troubleshooting Mode Options > Enable/Disable SSH and check if SSH is enabled, else enable it.

Step 2: Enable firewall rule for web traffic
Connect to the ESXi host via SSH and enable the firewall rule to allow web traffic. This is necessary to use the VMware Online Depot in the next steps.
esxcli network firewall ruleset set -e true -r httpClient
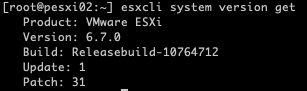
Optional Step 3: Check the current ESXi build and version
To confirm the current version of your ESXi host use the following command.
esxcli system version get
Step 4: List all available profiles in the VMware Online Depot
To get al list of all available profiles in the VMware Online Depot use the following command.
esxcli software sources profile list -d https://hostupdate.vmware.com/software/VUM/PRODUCTION/main/vmw-depot-index.xml
This list can be very extensive so it is recommended to work with filters. Appending a | grep -i ESXi-6.7.*standard lists only the profiles for Version 6.7 including VMware Tools.
esxcli software sources profile list -d https://hostupdate.vmware.com/software/VUM/PRODUCTION/main/vmw-depot-index.xml | grep -i ESXi-6.7.*standard

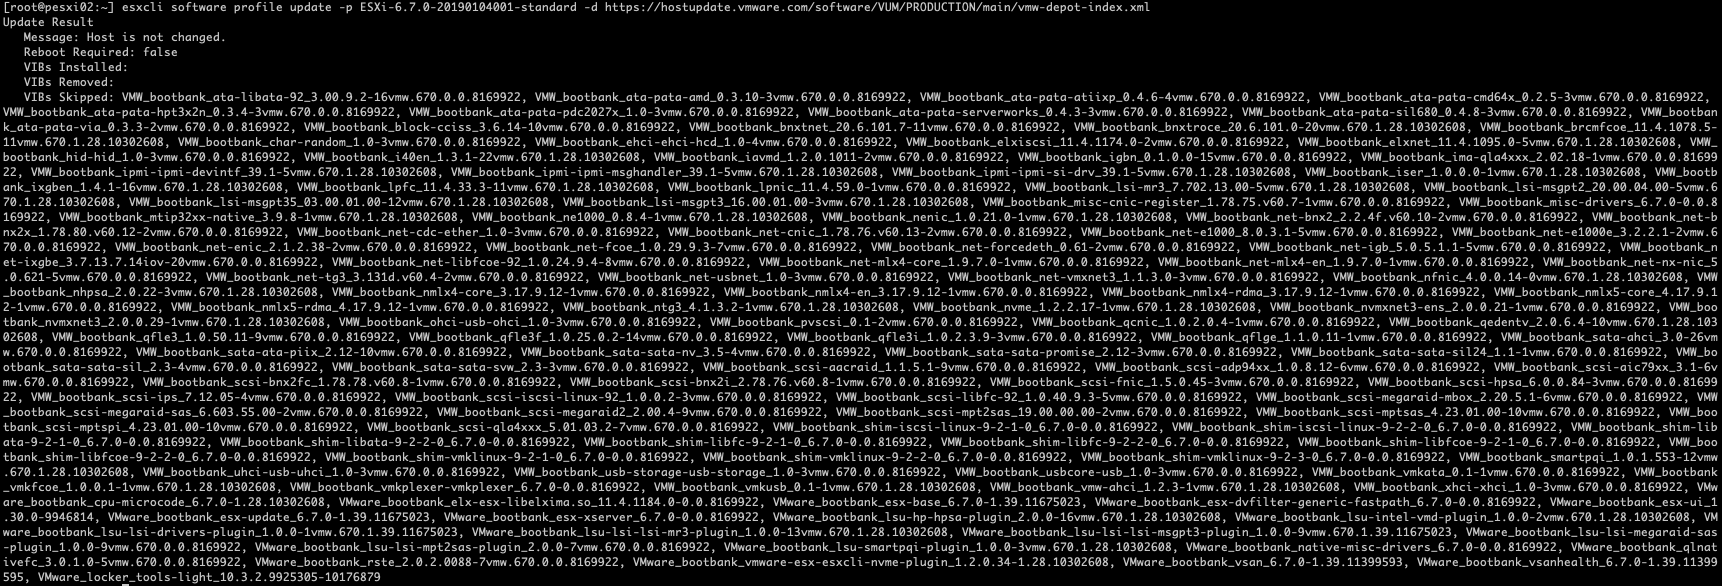
Step 5: Apply the selected profile from the VMware Online Depot
Select the desired profile and apply it to the ESXi host using the command below.
esxcli software profile update -p <profile-name> -d https://hostupdate.vmware.com/software/VUM/PRODUCTION/main/vmw-depot-index.xml
Optional Step 6: Reboot ESXi Host
If the update finishes with Reboot Required: true use the following command to reboot the host. Make sure there are no running VMs and optional the host is in maintenance mode.
reboot
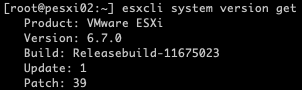
Optional Step 7: Check ESXi version again to ensure the update completed successfully
I finished the update with a final check of the running ESXi build and version using esxcli again.
esxcli system version get
Wrap-Up
With just a few commands it is possible to update an existing host to the current available EP6 using only the VMware Online Depot. Just make sure that host is configured with correct DNS settings and is able to access the internet. If this is not possible, a corresponding offline bundle can still be used for the update.